GTX R-10 ACR
Creating a modern twist on a classic legend.

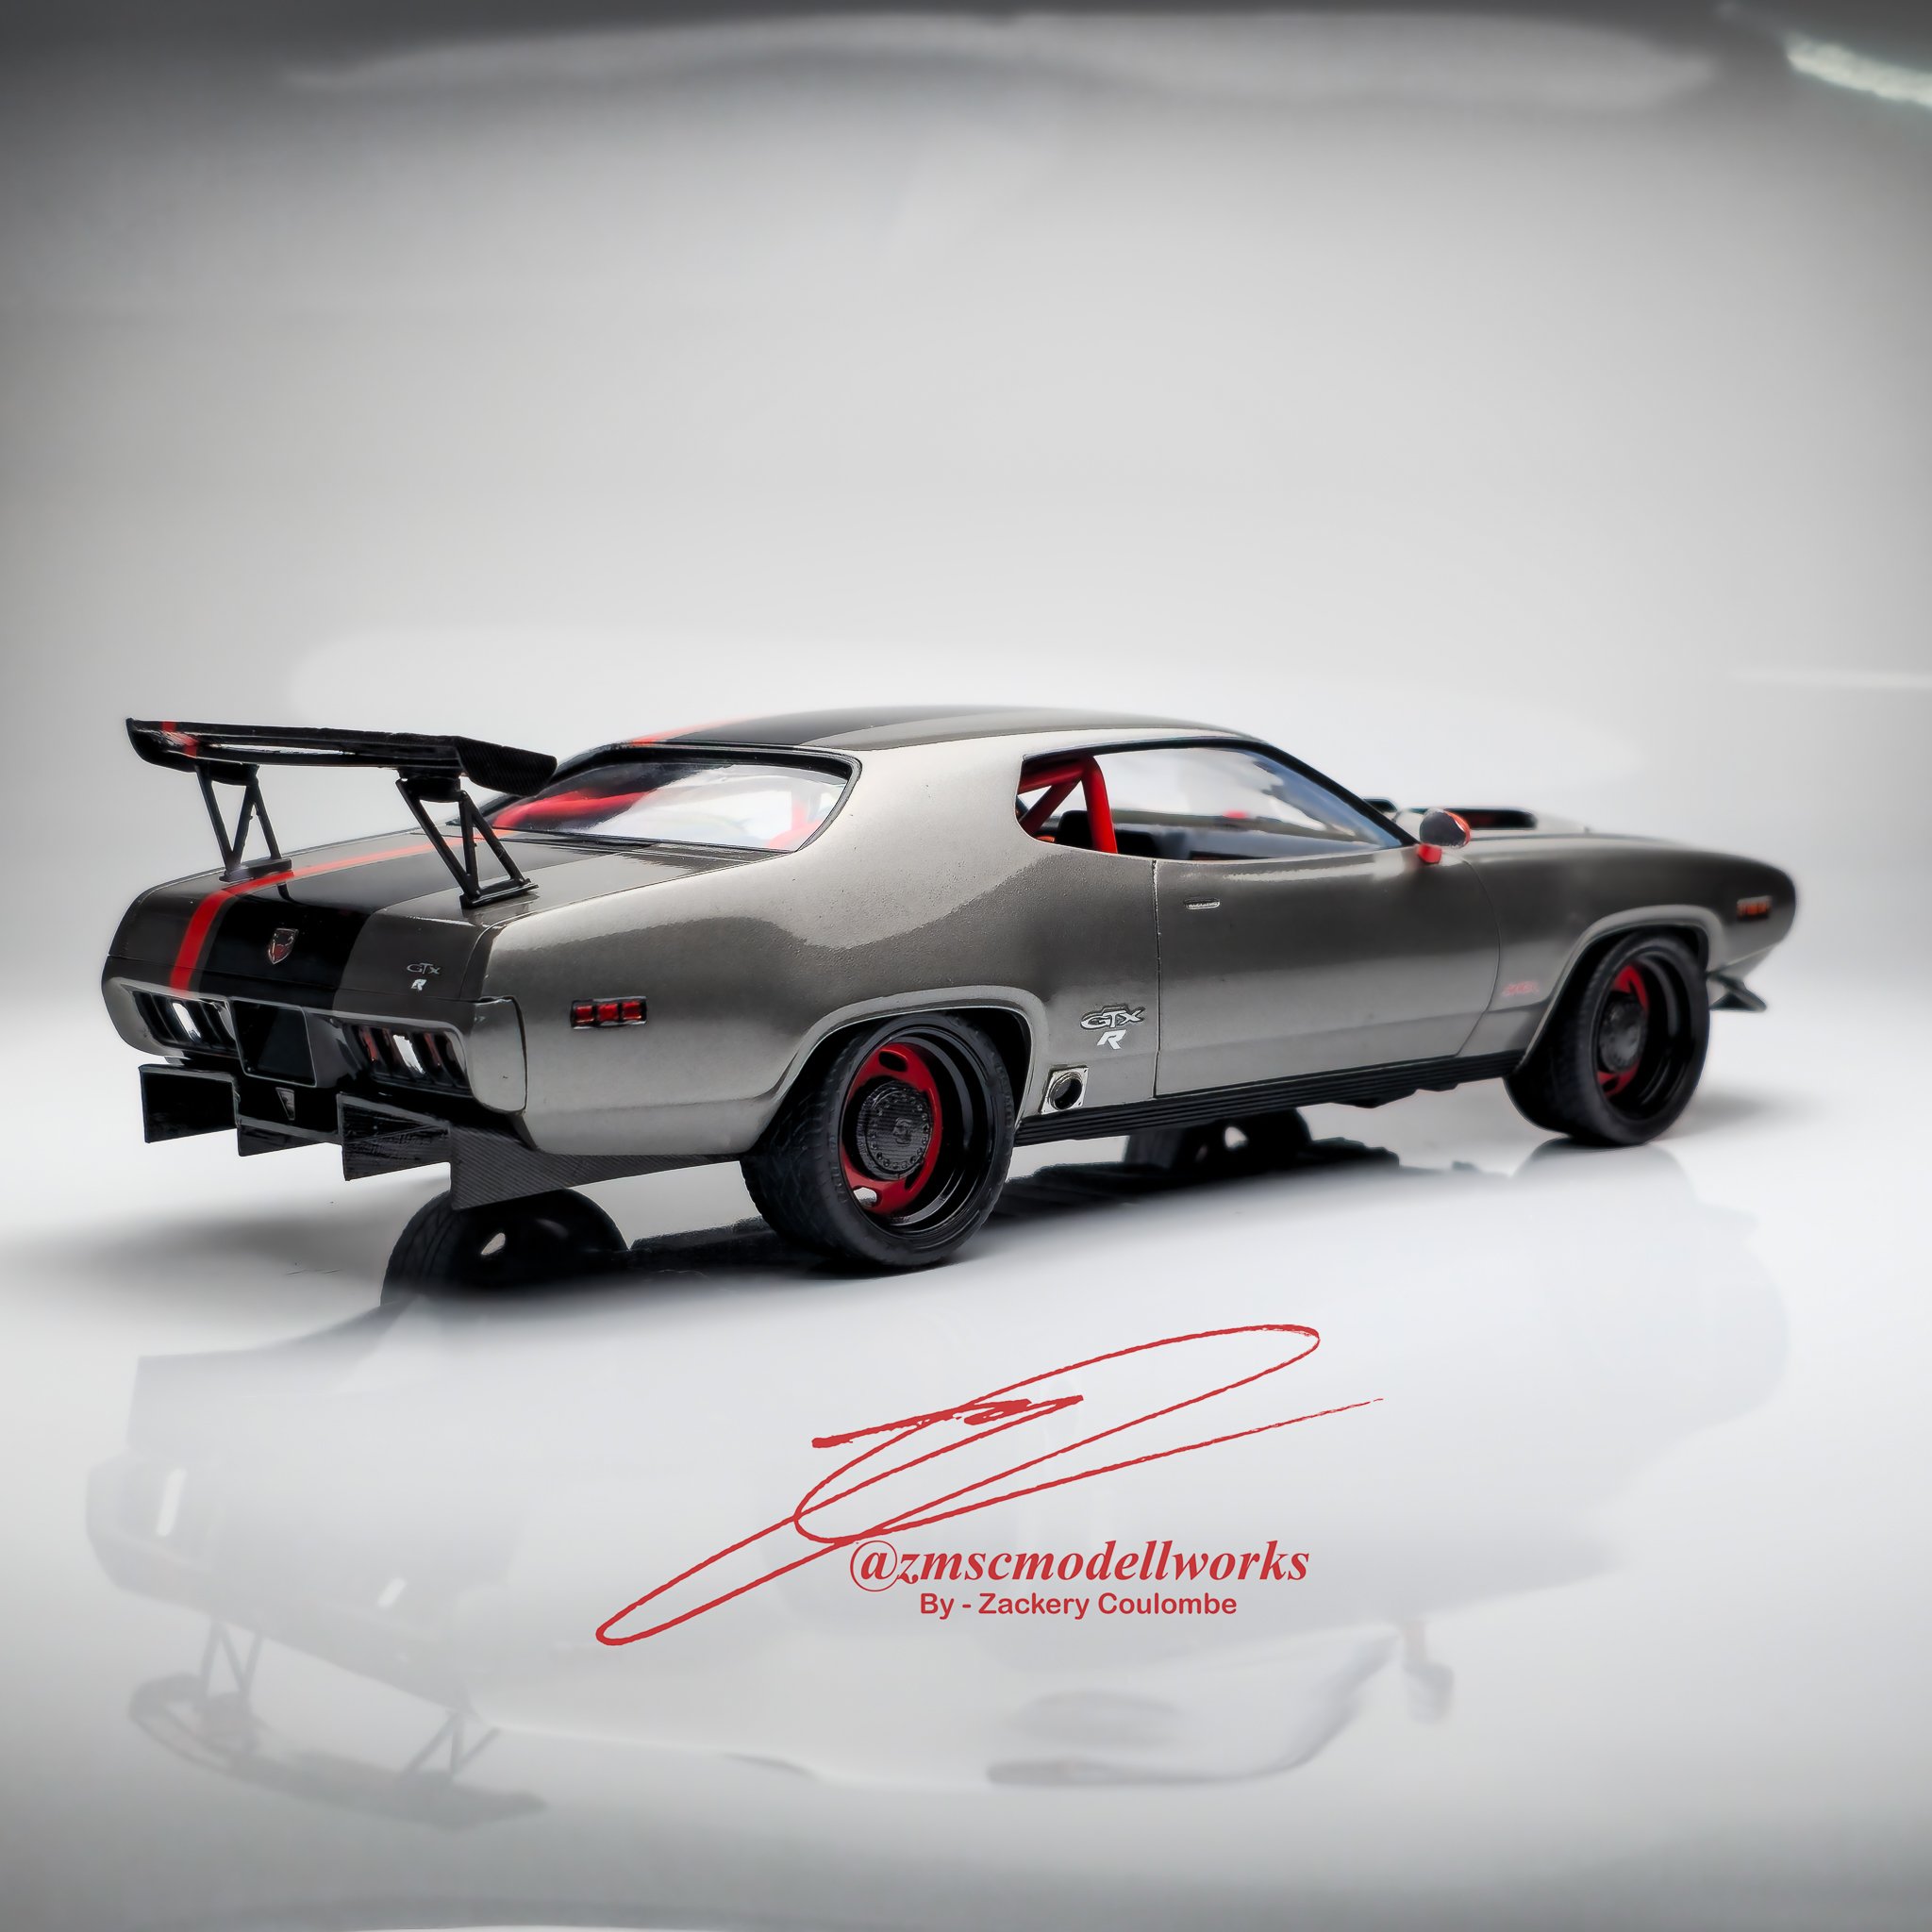
The 1971 Plymouth GTX
I’m a Mopar fan, if it wasn’t already apparent, but my favourites are probably the 3rd Gen Vipers. Even more specific to that are the ACR versions which are essentially plated racecars. Next down the list would have to be the B bodies, but specifically the Satellite/ GTX.
When I had first envisioned a ZB V10 swapped GTX I, like many others, was initially gen the thought from Aaron Porter’s Horsepower Northwest build.

While I liked the idea of a V10 GTX, I felt that his interpretation of it was too subtle and needed to be more on edge. This1 is in stark contrast to how Aaron kept the exterior pretty stock besides stretching the nose to fit the longer ZB block. This just wouldn’t do in my book.

The Vision
So I thought, why not incorporate all of my favourite Mopar aspects into this build. The sleek lines of the GTX, the heart of a Viper, and an ACR inspired cloak. It felt like a winning combination.
Firstly, I had to shoehorn the 3D printed engine and 6 speed transmission from the Viper into the chassis and under the hood. Cults 3D user Motabas makes some incredibly detailed engine and transmission models so if printed correctly, the level of detail you can achieve is astounding.While the real world GTXR too advantage of a nose-job and an ACR oil pan, I did not have such luxuries of time to pull it off. As such, the stock engine mounts meant that the intake manifold would sit 2 mm above the hoodline.

To solve this, I simply cut down the intake manifold in 3D builder down to the runners. Then I took those into Tinkercad and made some simple ITB trumpets while moving the fuel rails and injectors to the bottom of the stacks. The only other modification was the de-badging of the Viper text while retaining the R. The stock decal sheet had some back with silver bordered GTX logos which fit the theme.

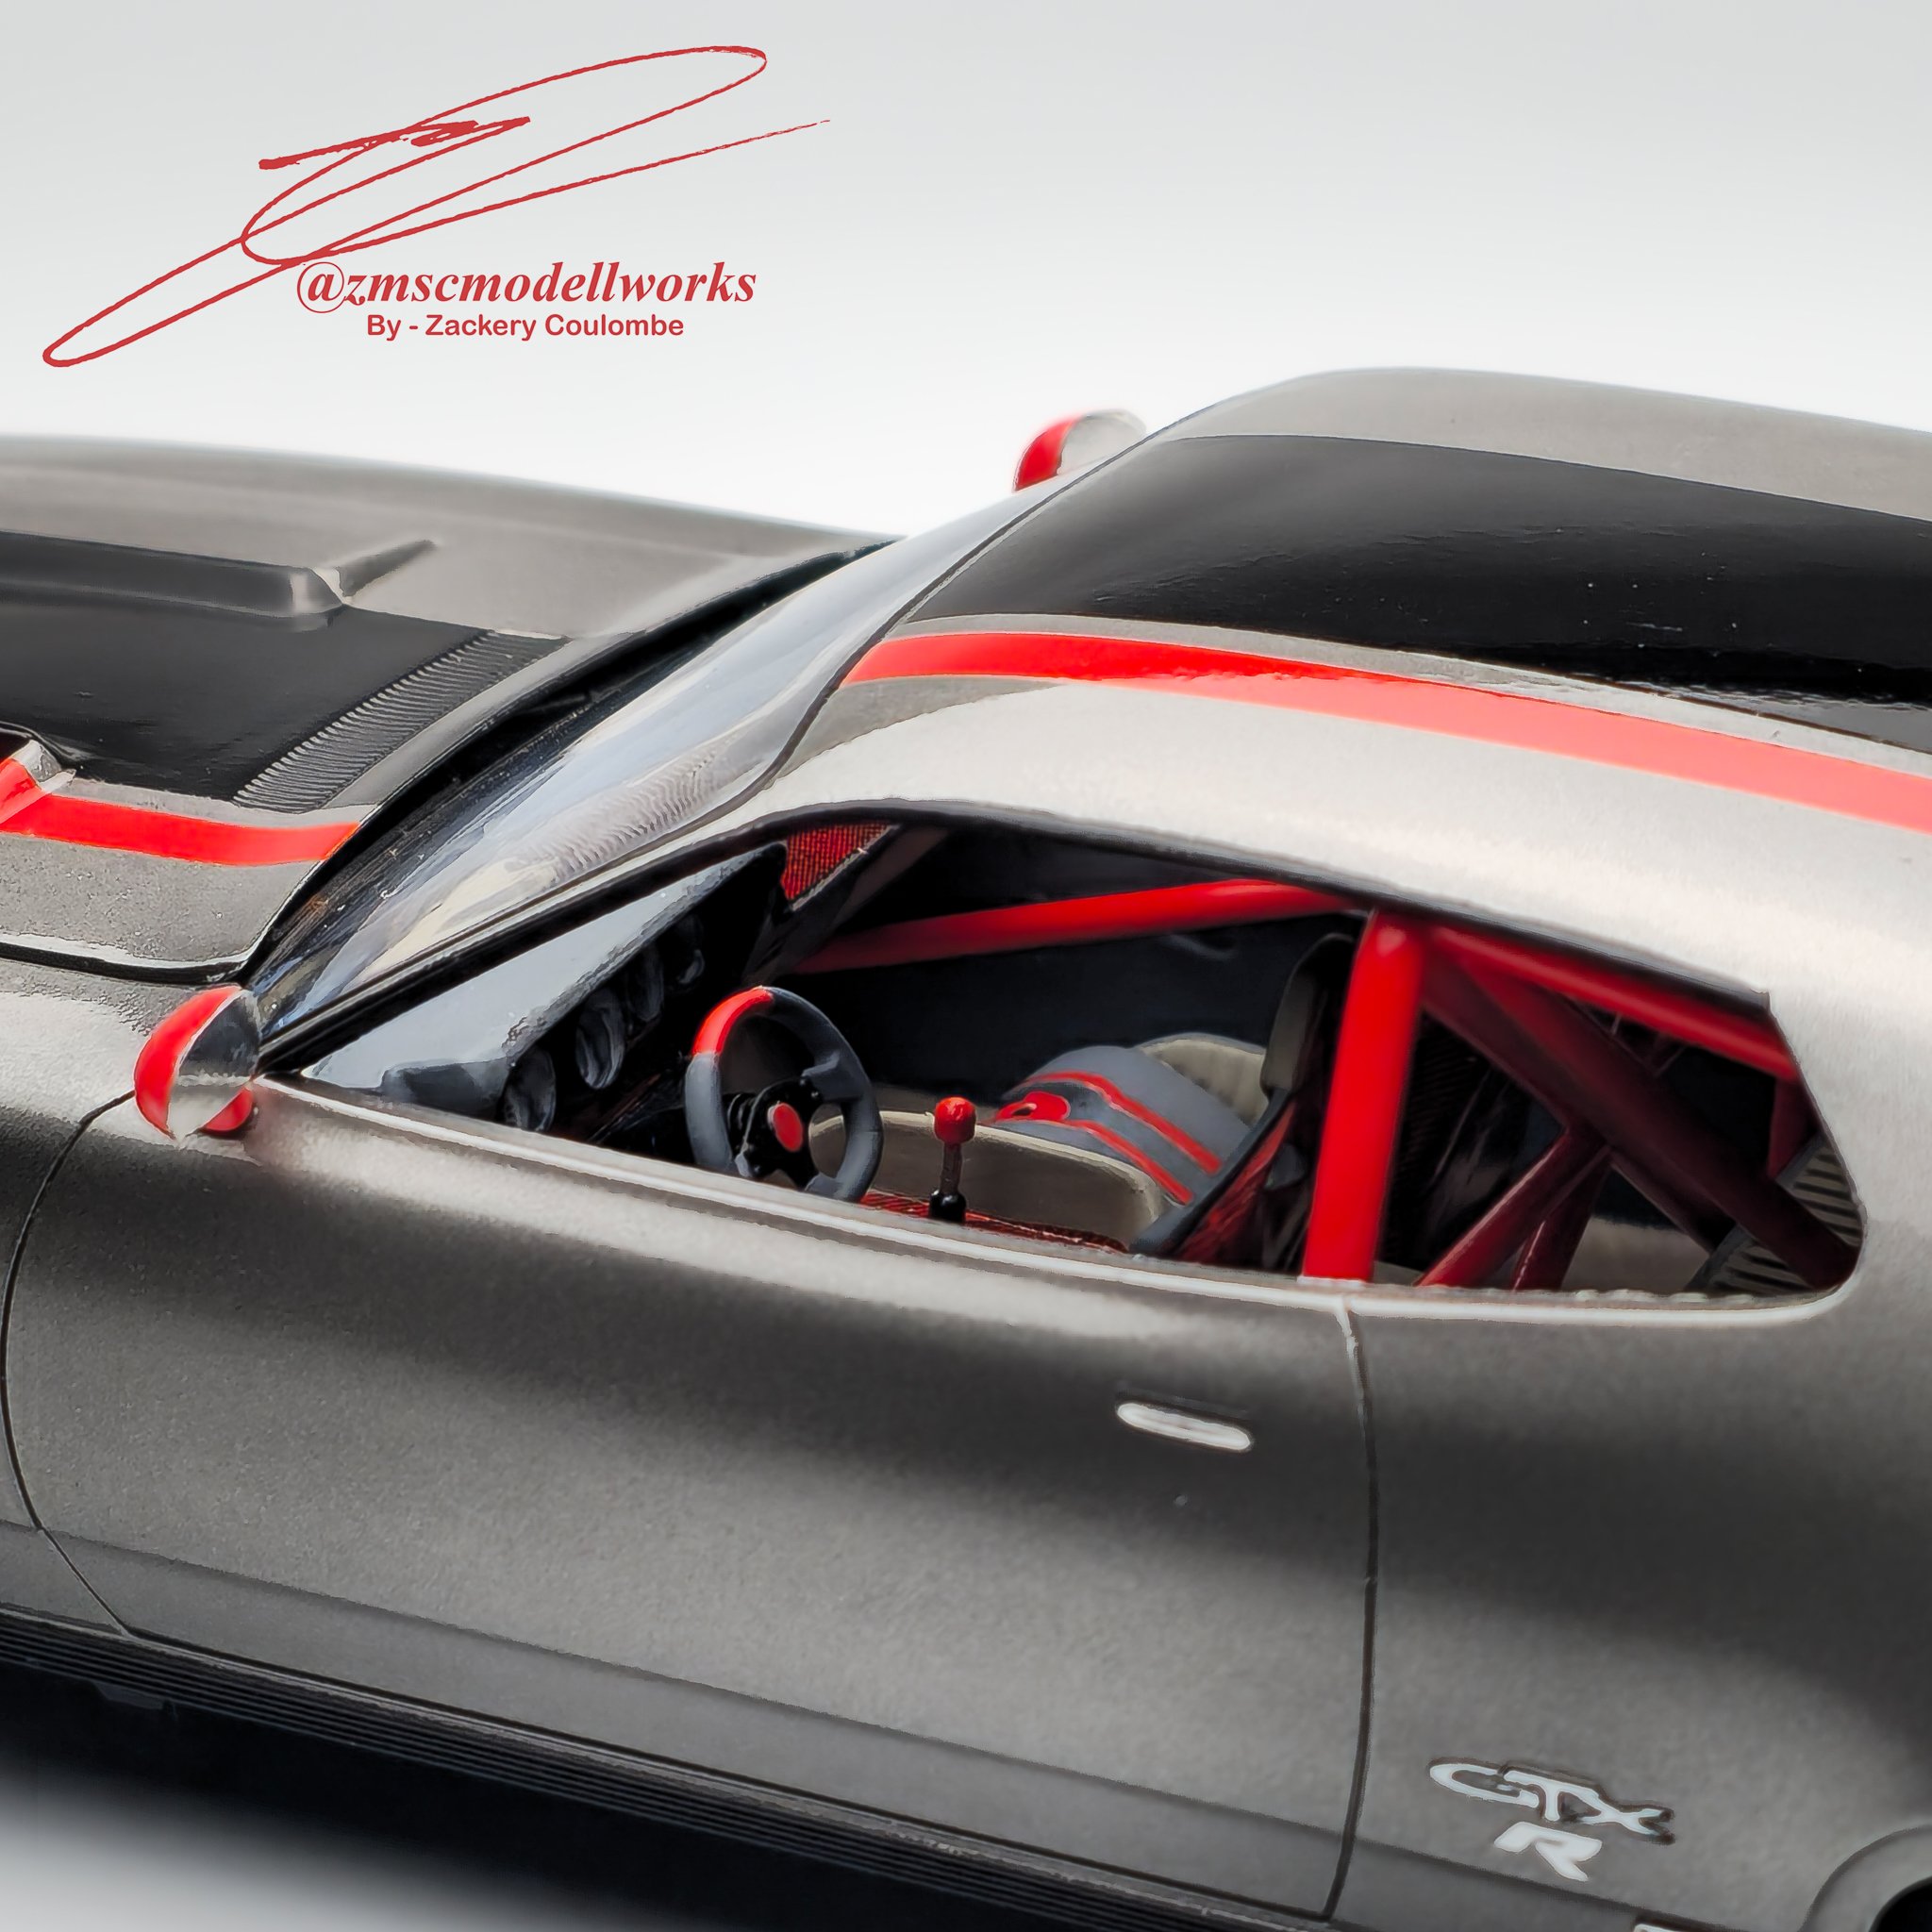
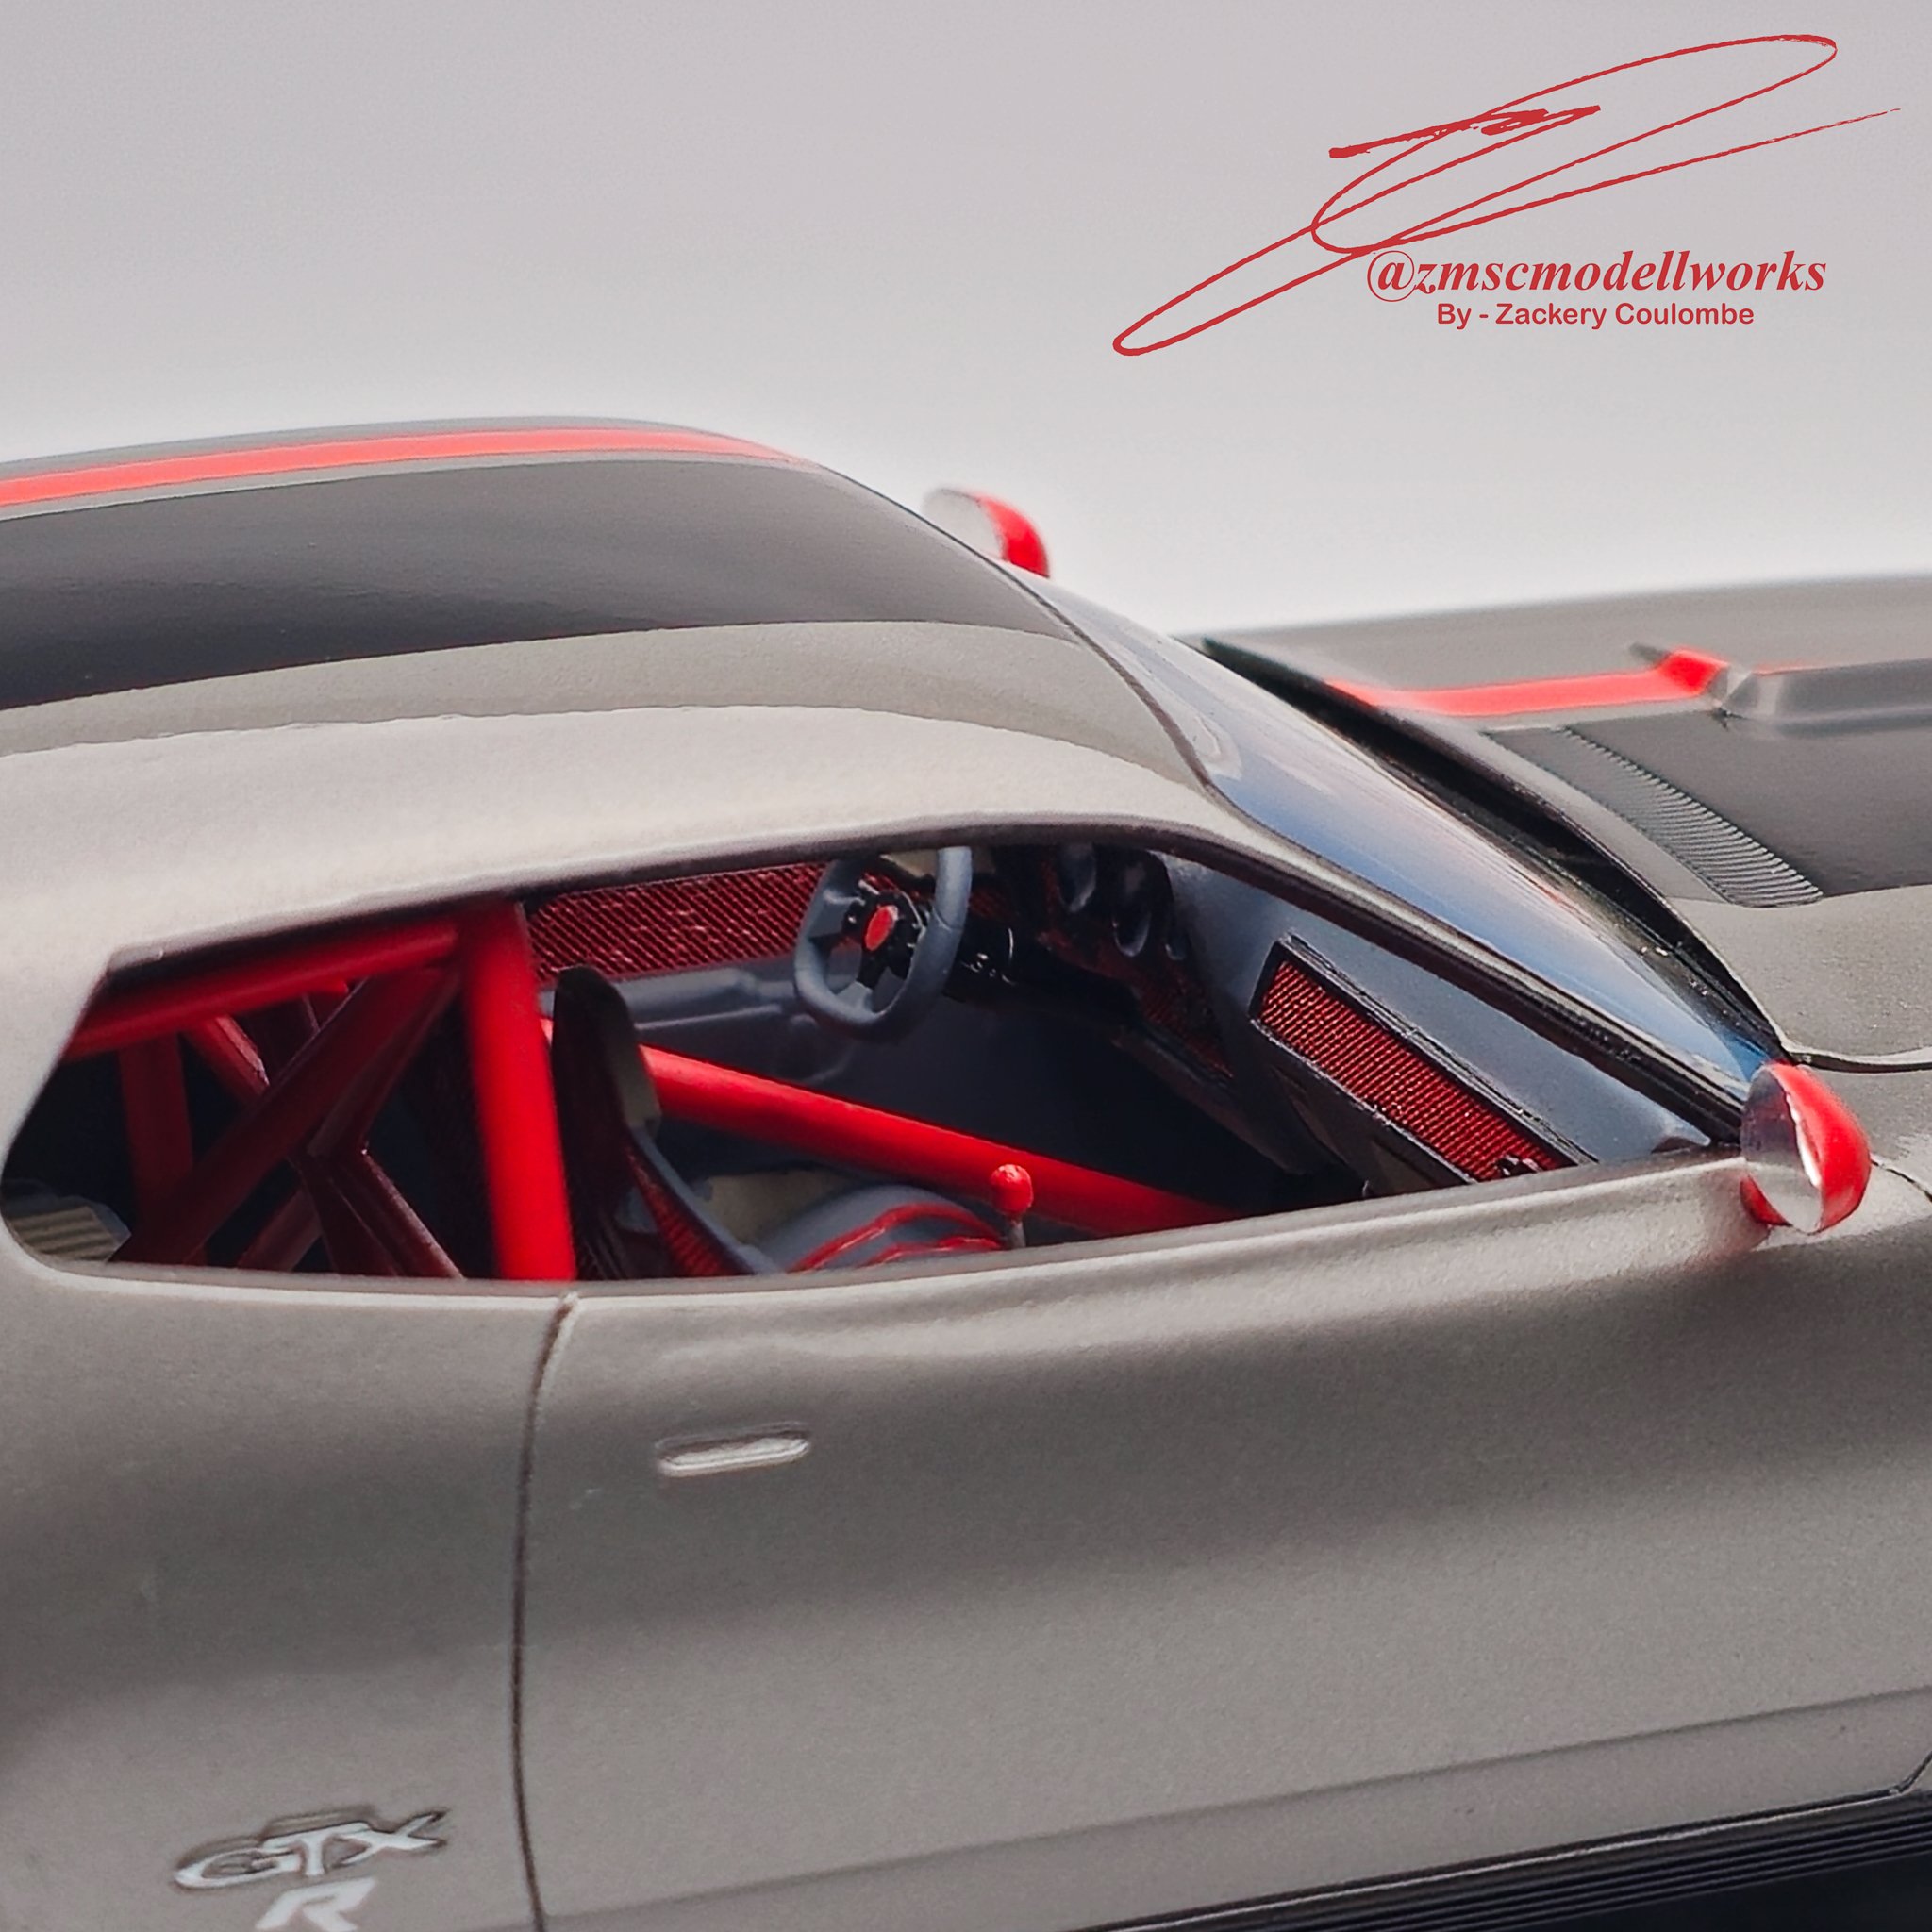
The interior wasn’t a crazy mod house. I put in a simple roll cage to stiffen the chassis, Viper Styled bucket seats, rear bench delete and a flat bottomed steering wheel. A 3D printed gear lever (that came with the Viper 6spd from Motabas) finished rounded out the additions. I didn’t want to do full carbon panel replacements due to time constraints bit I did want to break up the interior rather than the traditional black leather monotone. One of these was a color theme I planned on carrying out through the rest of the car which was Corso Rosso Red from Splash Paints.
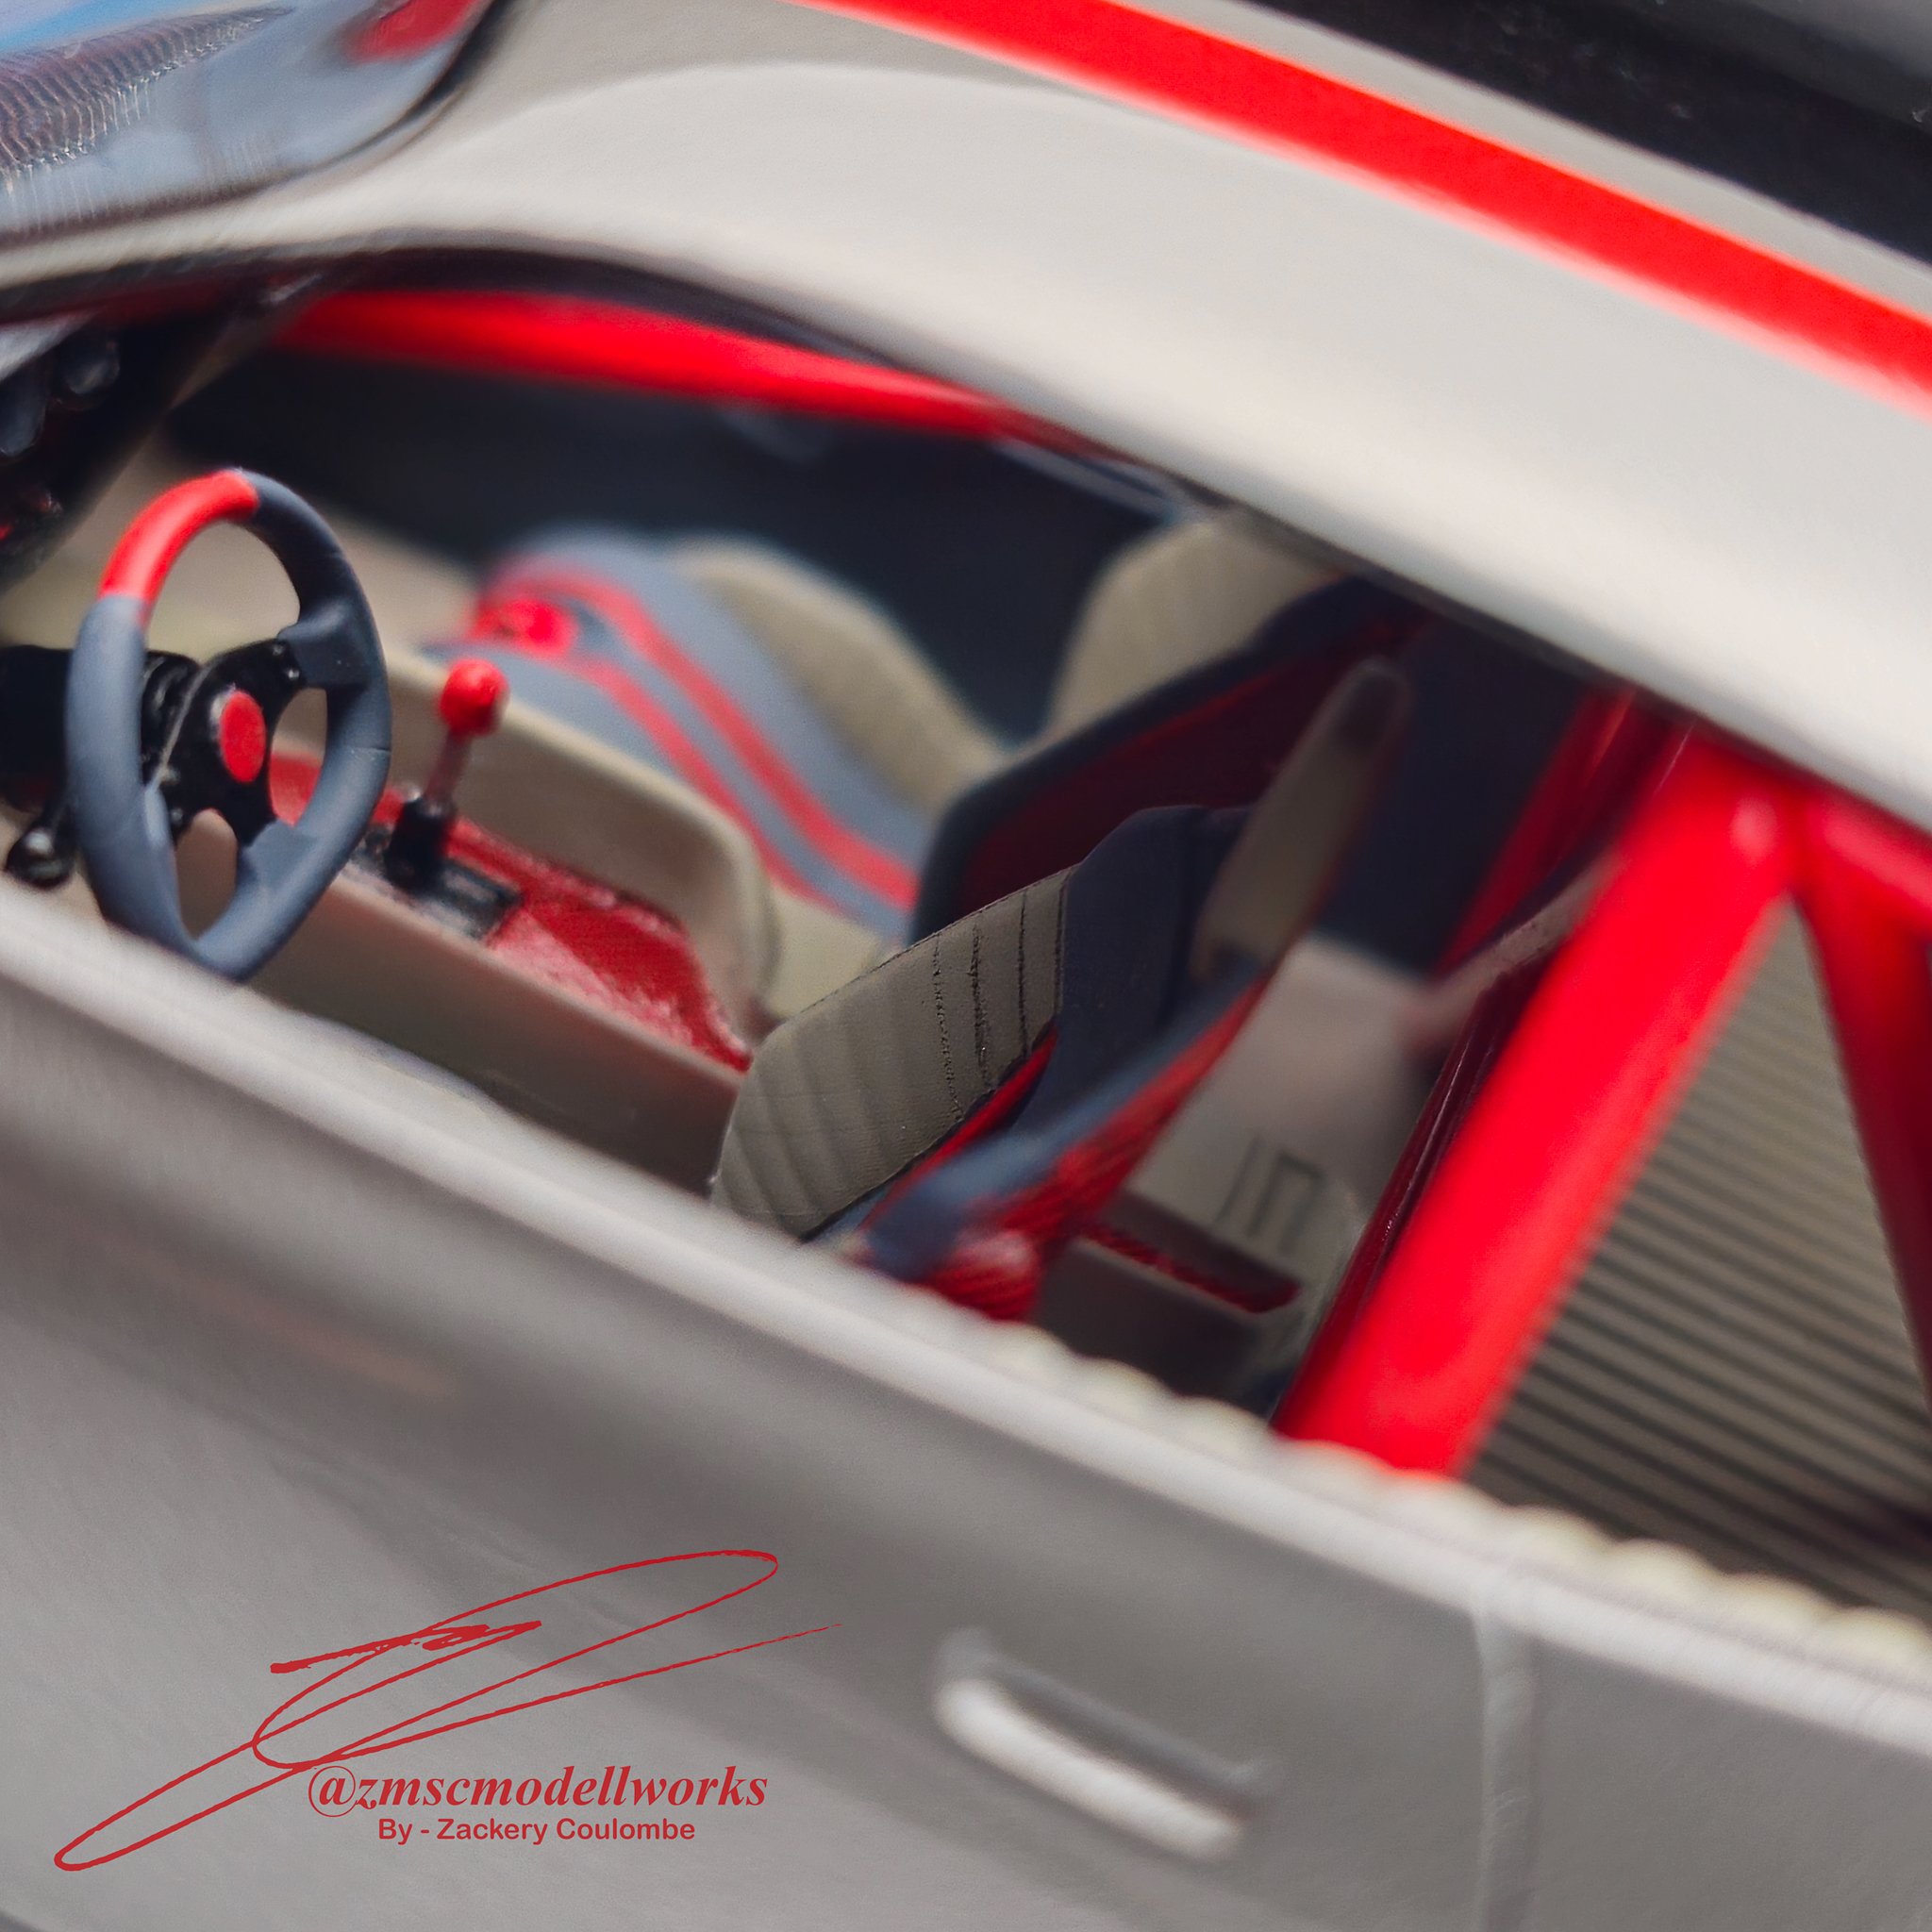
The remainder of the interior color palette was Ocean Grey 2 and Sky Grey from Tamiya.
To make the red accurate in hue while being vibrant, I primed those surfaces with Mr.Surfacer 1500 Pink. This was also sprayed where the wood grain would have been however instead of wood, I used Zoom On Models Clear Carbon Fiber pattern. This was also used on the seat backs to add a bit more flair. To round off the inside, I carpeted the floors with a grey like color. I’m not a big fan of flocking. Its messy, has a lot of steps, plus the final result to me looks like shag carpet. Self- adhesive felt, typically used in jewelry boxes, is as easy as creating a tape template, cut it out, peel off the backing, and then lay down on a clean, dry surface.

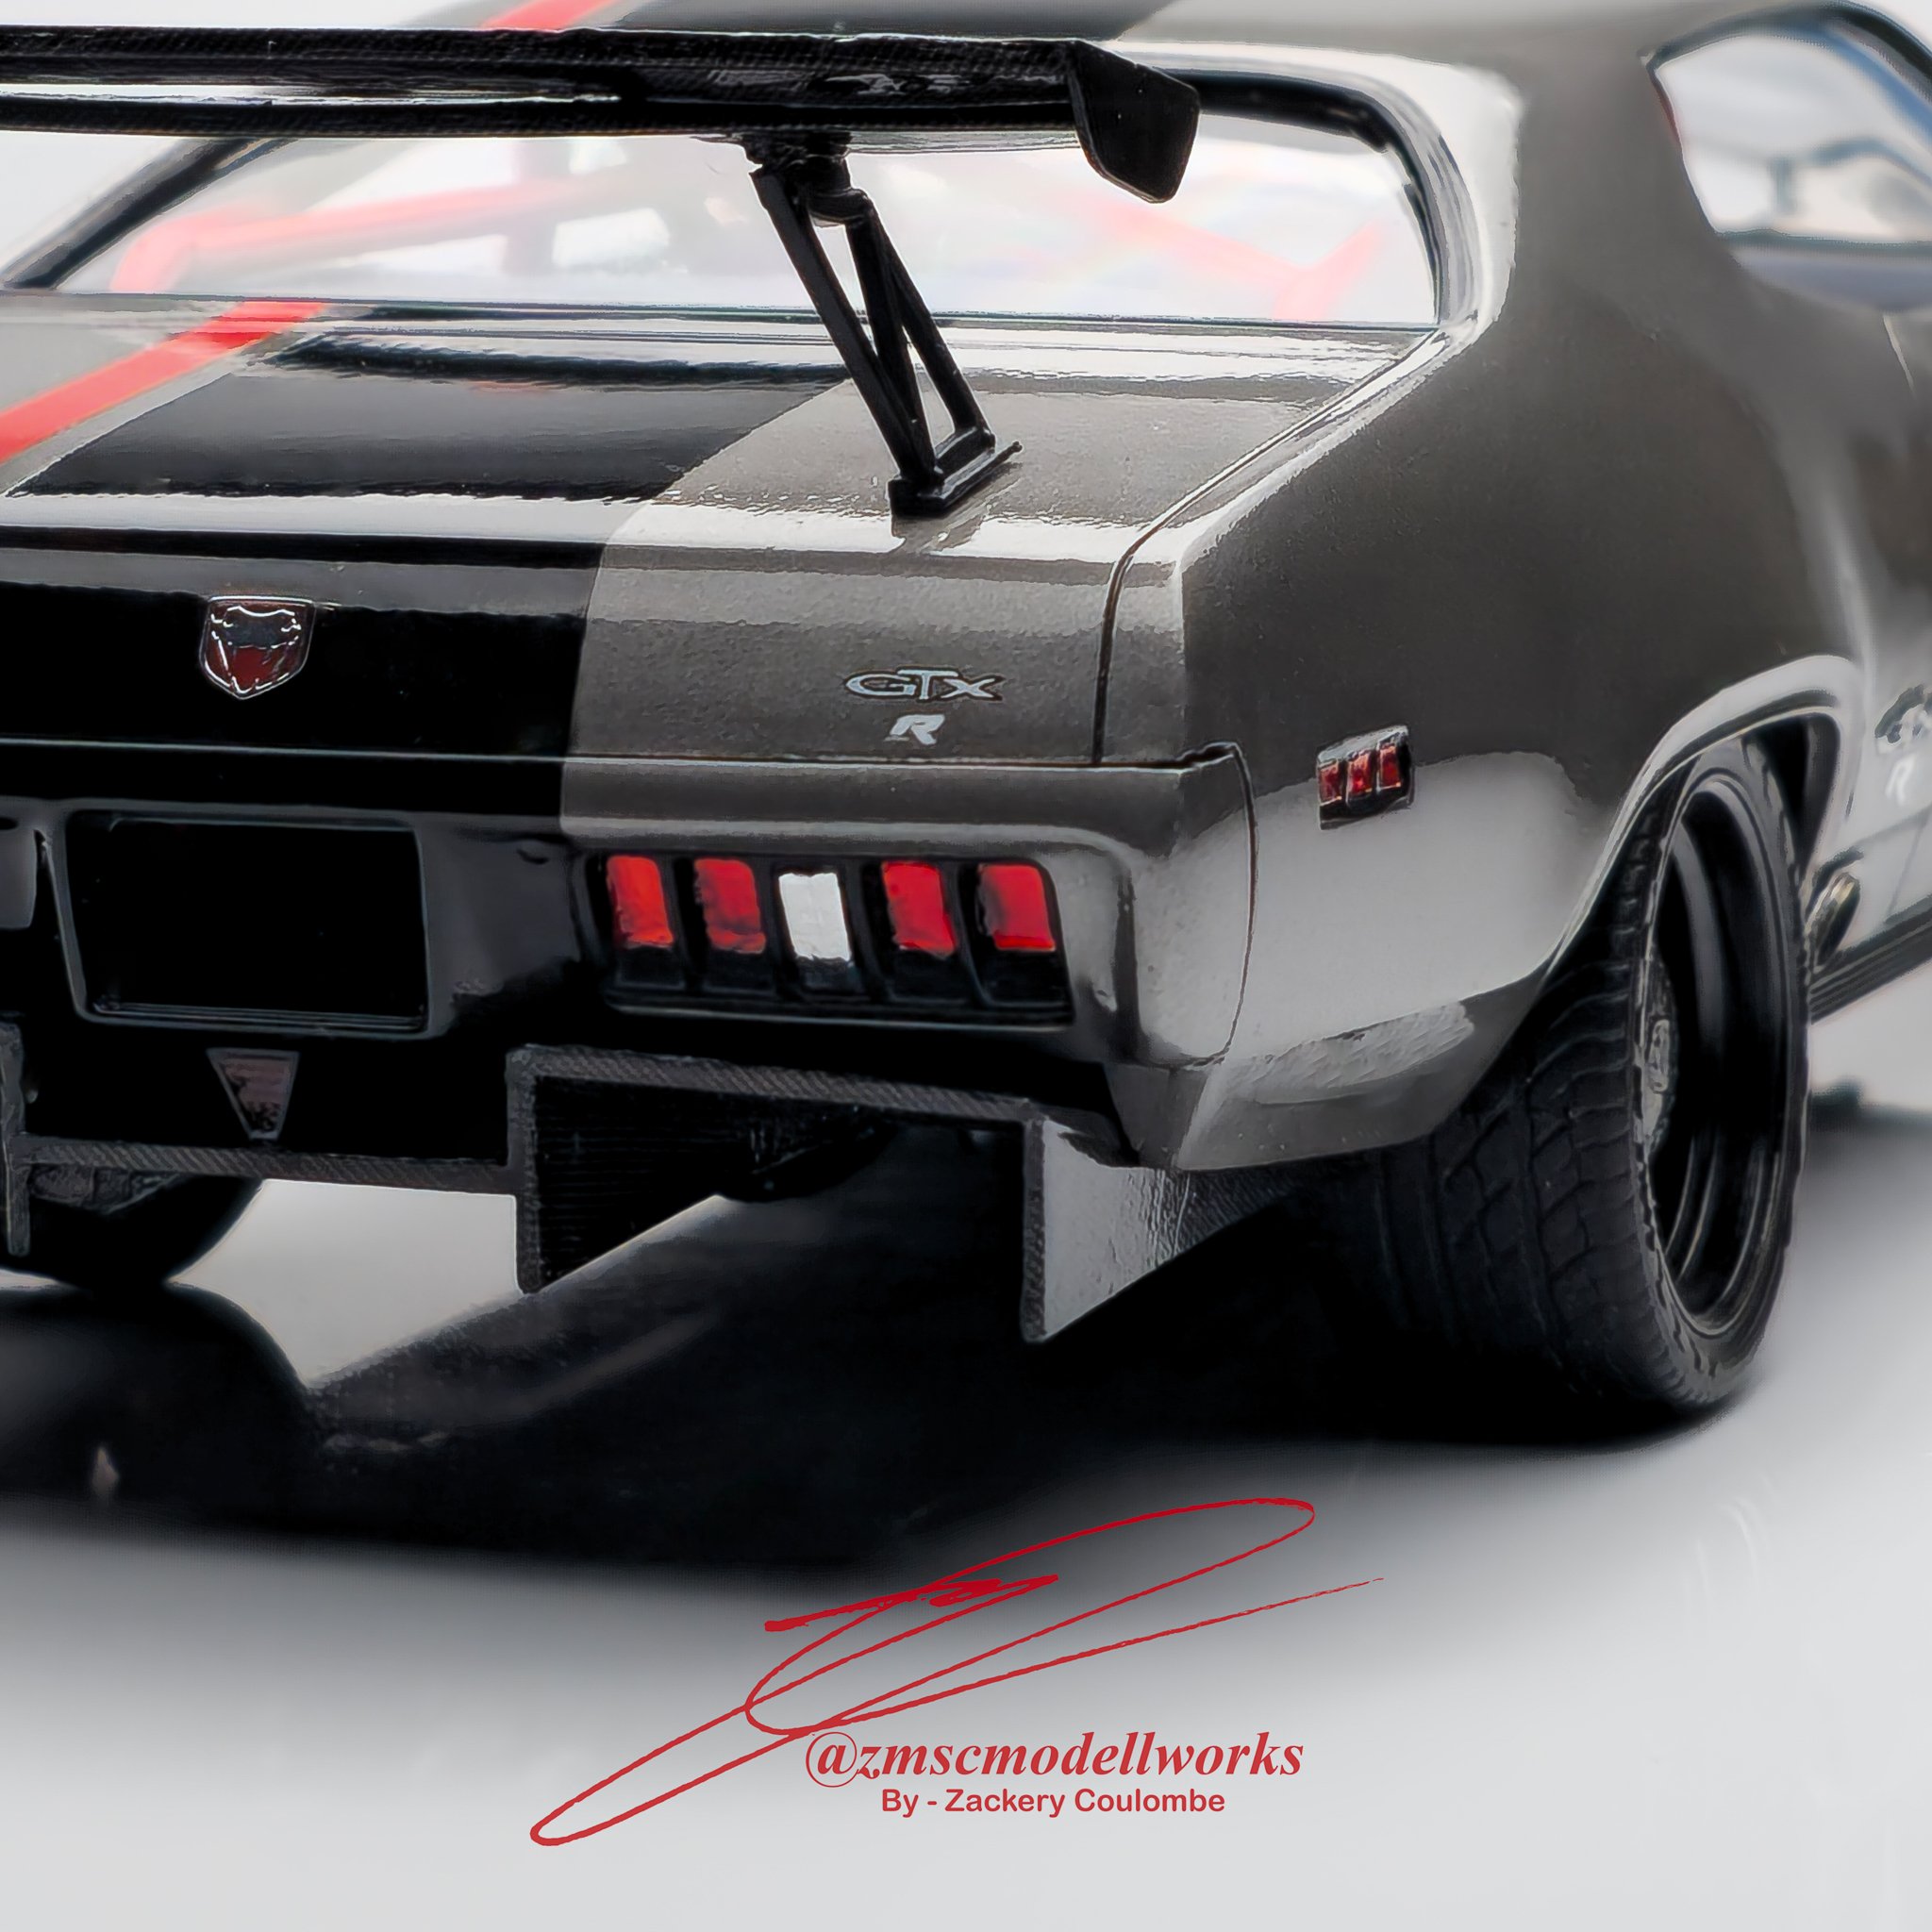
With the Corsa Rosso color theme in the engine bay and the interior, it was now time for the wheels to get their touch. I printed these oversized Mopar 6 slot steelies from Z Force Model Worx. They are 1/25 scaled 20 x13 on all four corners. They also came with hub caps which I felt could use a bit of the ACR touch so I got some metal Viper emblems from Easy Decal. They are similar to the Tamiya metal transfer decals you get in their premium kits, albeit a little less tacky so in some situations, super thin cyanoacrylate may be required. With the caps primed and the metal transfers on, I draped Scale Motorsport decals overtop, sealing in the detail. The wheel barrels were painted black to contrast the red and the Splash Paints Rubber Black of the Eagle GT tires, which also had the benefit of blending the wheels into the arches whilst hiding their bulk in the process.


Chassis modification was fairly minimal in the overall scope of the build. The front spindles were dropped 1.7 mm to set the front down lower, while the leaf springs in the rear were deleted in favour of a Ford 9 inch on airbags. The trailing arms helped to set the rake properly which tied in the overall stance of the car sitting still. This dropped it 2.3mm from stock. The brakes were another modified design using Tinkercad which involved taking some rotors and embossing the Viper logo into them. 6 pots front and 4 pot rears clamped onto 16'‘ drilled/ slotted rotors
Some small details that aren’t well seen are the 6 speed Tremec T56 mated to the Ford 9 inch via a carbon fiber driveshaft as well as the tucked 2.5” exhaust.

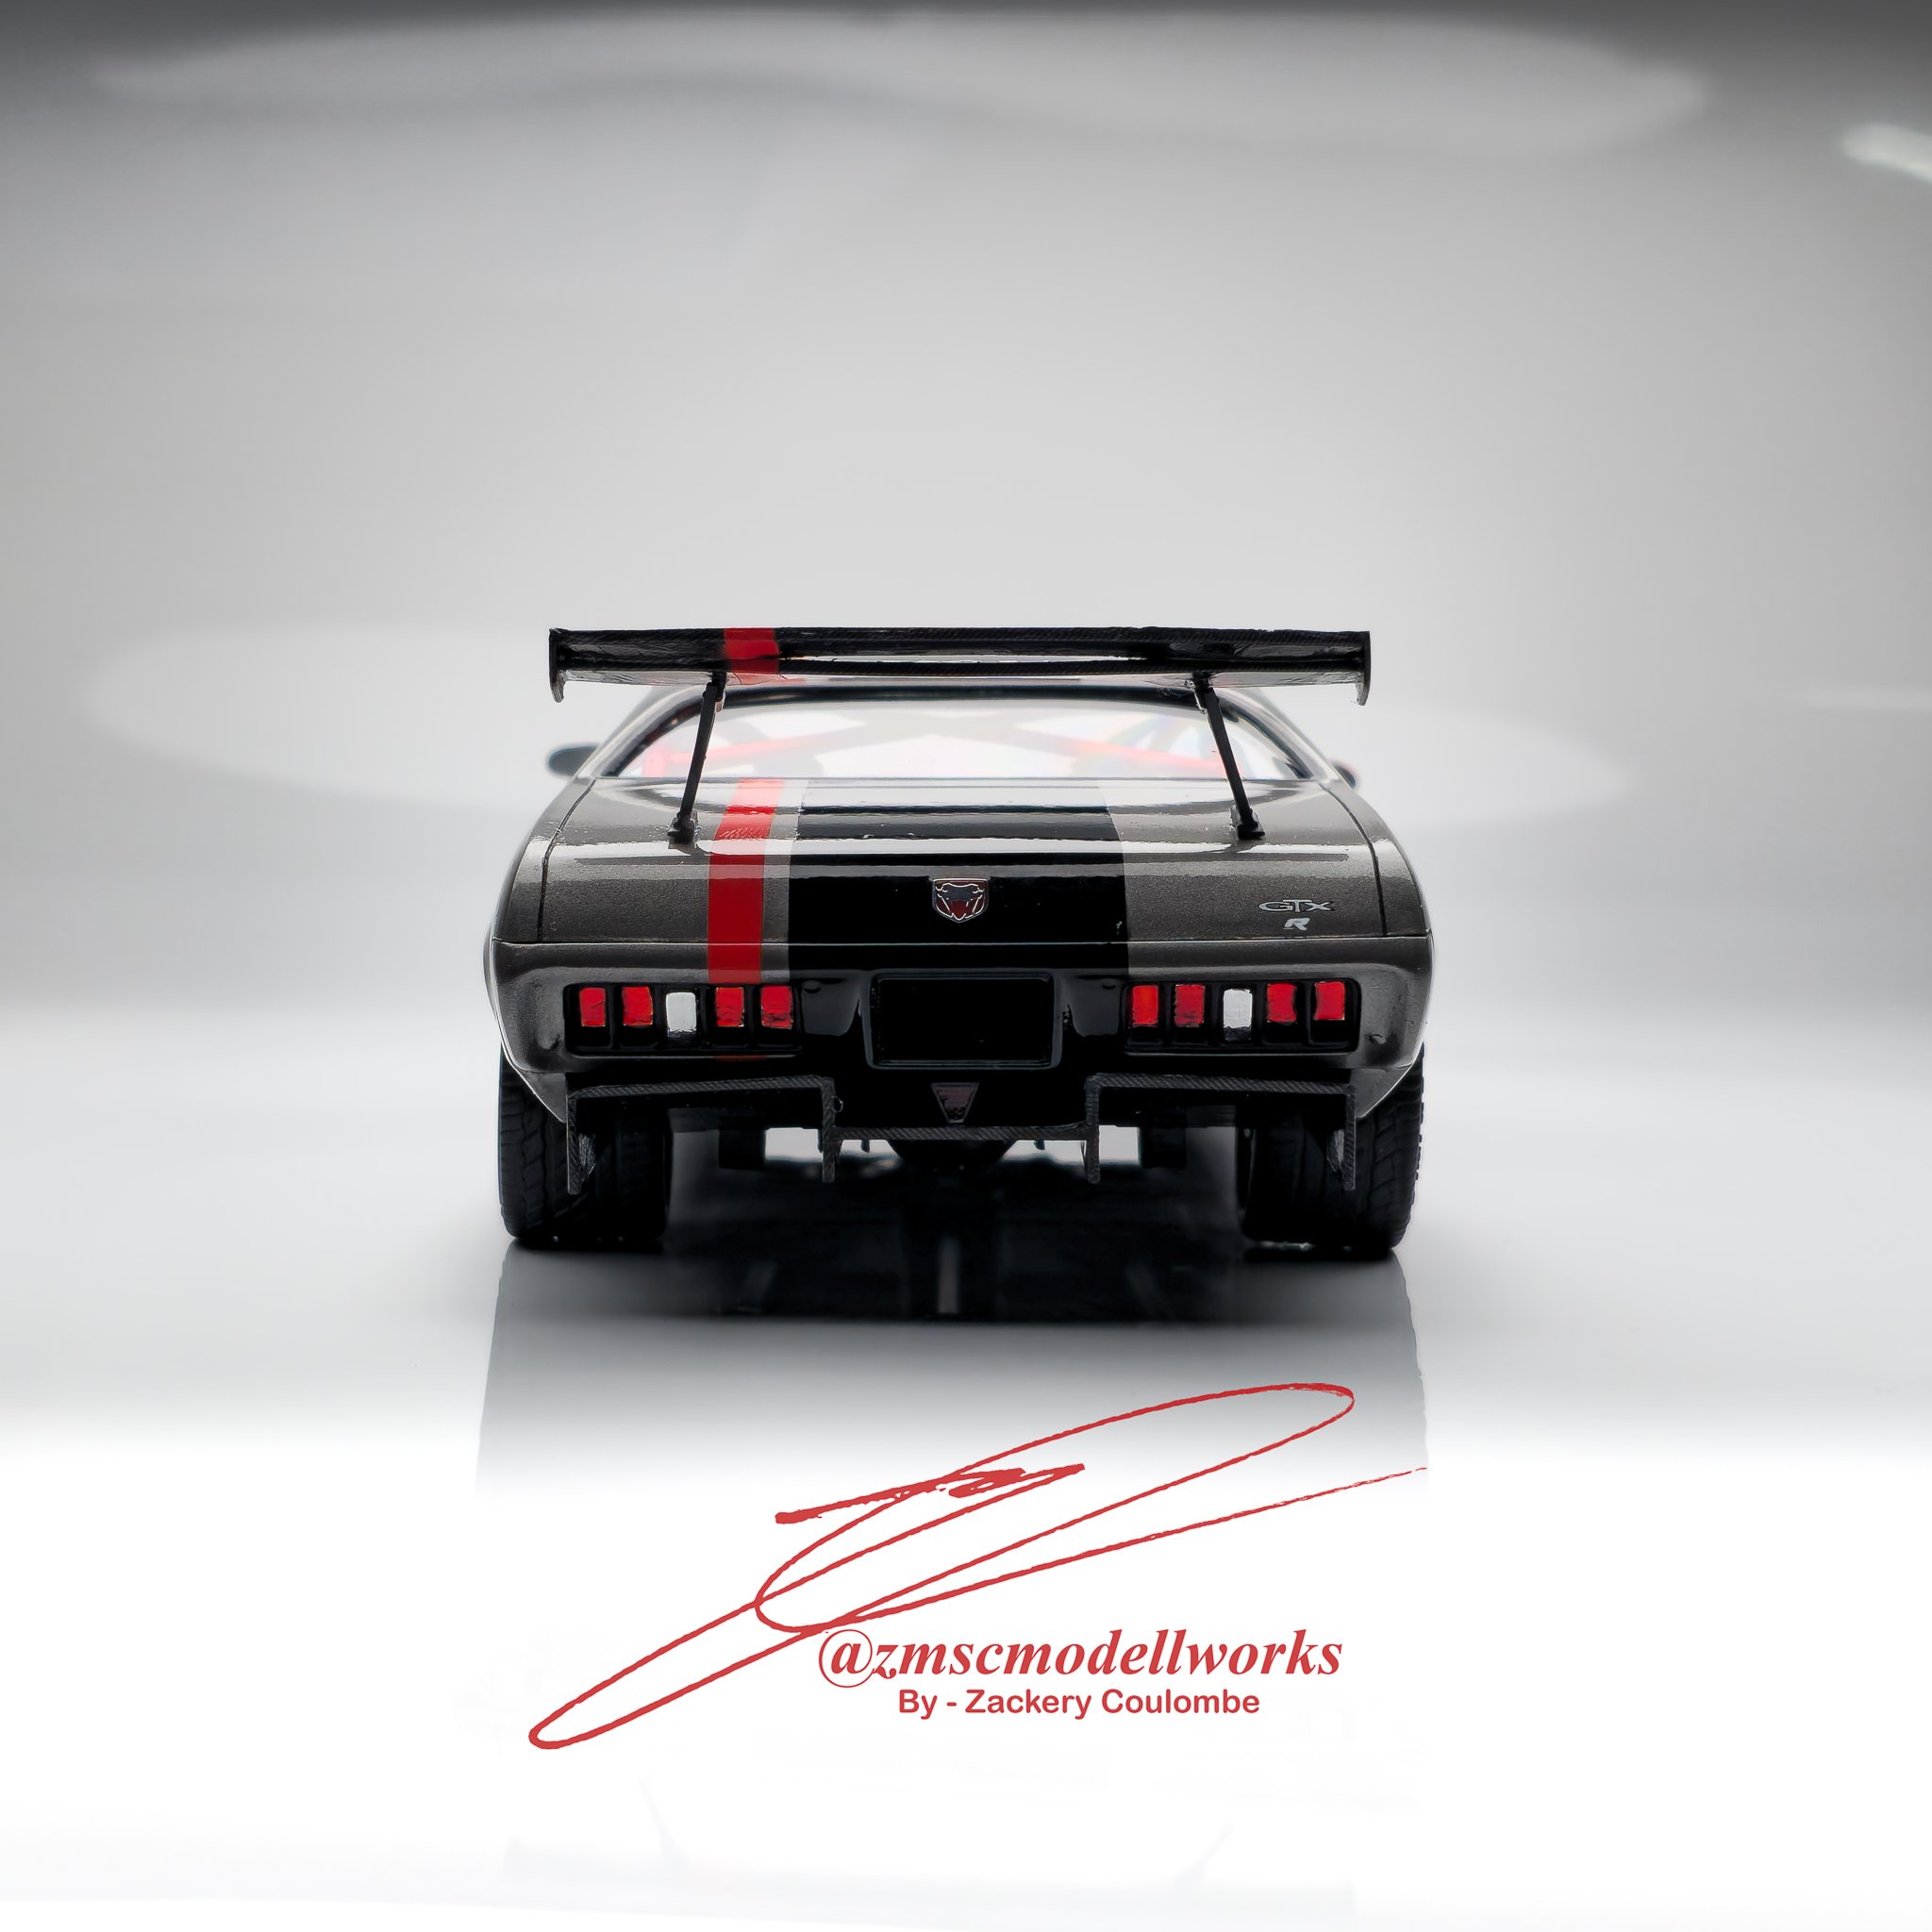
The exterior was the last hurdle but one of the most important to get right as it would set the stage for all the other parts of the build. The steel color on the 4th Gen Vipers really stood out as the choice for this build. With the black center stripe and adjacent highlight stripe, it just made sense. I used a 3:1 mix ratio of Steel and Iron metallics from Splash Paints. The center stripe as done with Beluga Black, whilst the red was again Corsa Rosso. Both colors from Splash Paints again.
The use of carbon fiber was minimal but strategic. as were the exterior mods. Starting at the front, the chin splitters were widened and lengthened slightly before receiving the carbon treatment from Scale Motorsports. Grilles usually are filled in so I opted to cut out the portion between the headlights and replace it with a fine mesh. The GTX’s headlights got replaced with 3D printed LED units to update the look ever so slightly. The fog lights got the same treatment but tinted yellow to retain the vintage look.
I liked the GTX hood more than the Satellite’s but felt it could use some love. A viper styled NACA duct was sized, aligned and inserted. After paint was on it got carbon’d as well to give the impression that the hood was moulded in such before paint. I wasn’t sure initially about the cross-ram intakes that weren’t actually intakes, until I encountered the issue with the intake manifold. Thankfully the new ITB setup aligned perfectly with the vents, so it was simply a matter of opening them up and cleaning up the edges.


Moving rearwards, there were subtle but striking modifications made. The door handles were shaved and flushed with the door, the rocker trim got a semi-gloss black finish….oh yeah, and the side exit exhausts. A harkening back to the Viper doner.
A large ACR-like rear wing sits atop the trunk while a custom carbon rear diffuser was made which tied off the final homage. An F1 style brake light added a sprinkle of European flavor.


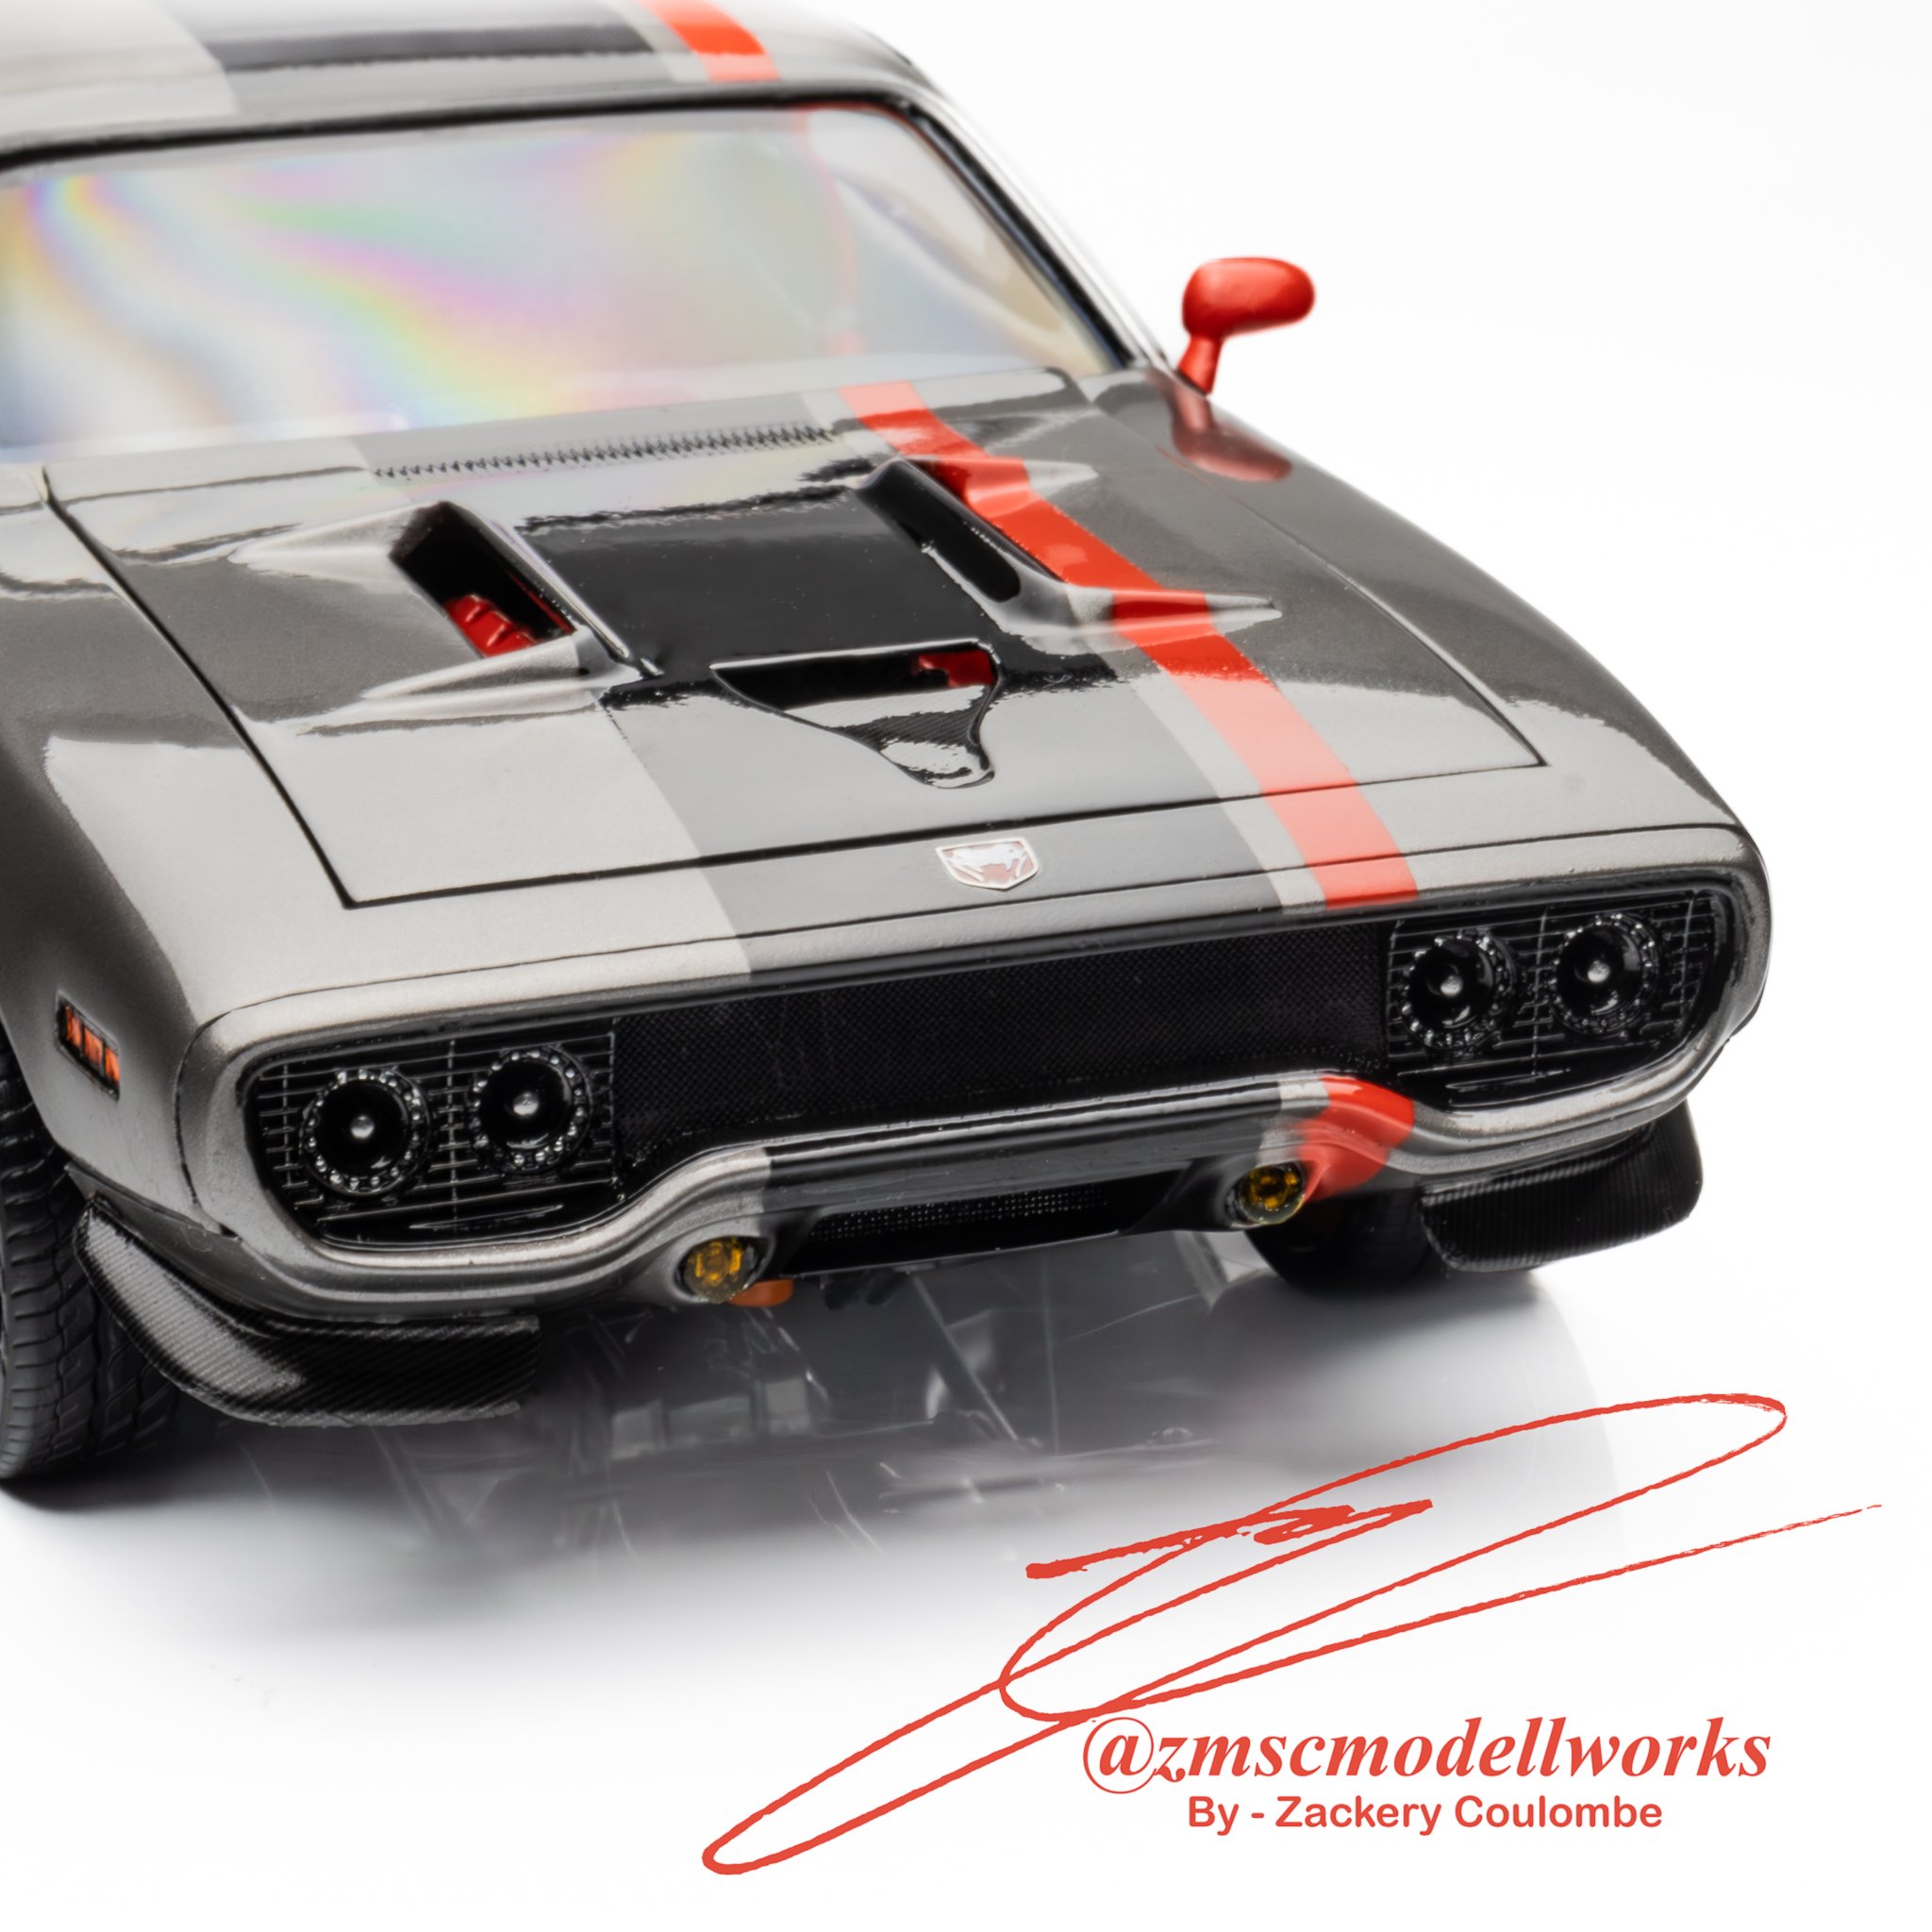
Easy Decal again came to the rescue when I was looking at badging the GTX. Under the metal transfers was some spare Viper badge decals from the ACR kit, as were the ACR logos on the side. Under the GTX badges I ended up cutting off the R as well from some spare viper decals. Taillights and side markers were taped off and painted Semi-gloss black before getting some bare metal foil treatment and gone over with Tamiya clear red and orange.
There are things I probably would have change or done differently if this wasn’t done as part of a 2 month build off. I would have liked to put in a braced front splittern the nose rather than the two chinlettes, A more purpose build chassis would have allowed me to do a fully independent wishbone setup all around and utilizing a viper rear diff as well. This would have facilitated the ability for me to widen the GTX a-la Muscle Rod Shop style, essentially keeping the stock lines but “blistering” the fenders wider to match the aggressive side profile.
The ITB setup was cool and turned out ok for the build but I felt was rushed in the time I had to build. It could definitely use some refining. Plus making an APR style oil pan would have allowed me the clearance to sit the V10 lower and utilized the stock intake manifold.